Saturday 20 April 2013

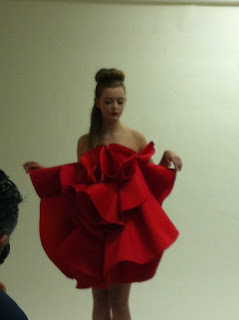
Photo-shoot of Look 1 with David Lam

At Uni we had a day of Photo-shoots ....Images to be used for our postcards and Brochures advertising us and the Uni.

Look 1 was being photographed for this....Taking inspiration from Couture Dior book featuring oriental inspired photo-shoots, I began thinking about the overall look and styling that I would like my look to have.
Look 1 is very structured and overpowering, I did not want to bombard the look to much make up, over the top hair or accessories. 


Eloise (model) posing for the theme of the dress


I wanted to take inspiration from Dior and have a very luxurious feel to the overall image. 


Having a pose that makes the dress look delicate and soft against the sculptural bows of fabric


 Studio Shot - Beautiful image


Make up - dark eyebrows, with eyeliner flicks one being black and one red with red lipstick.


 Eloise has very long hair which I thought would be great for my look, having a high rolled bun acorss the top of her head  and having her long hair draped across her shoulder and rolling in the holes within the curves of the fabric.

The final photo

Wednesday 17 April 2013

Look 1 - Development of attachments

Once I had cut out all the circle attachments and sewn them together, I needed still to make them firmer, with this I tried experimenting using starch, by spraying this onto the circles on both sides and ironing until the starch had dried. This did work and made the circles a lot firmer and gave me the quality that I desired for the applied circles.

Once I had starched all 6 of the circles that were to be applied to the main dress, I cut a straight line acorss half of the circle to the centre point, this allowed for more movement and ability to manipulate. 

Featured on her are 6 circles of 3 different circumferences, Circle - 1 being 48cm, Circle 2 - 70cm and Circle 3 - 110.5cm in circumference. I began playing with the placement of the circles and randomly pinning them to the main dress and seeing what I could achieve. 

With the smallest of the circles being placed at the top of the dress at the bustline and progressively moving onto applying the larger circles - There are 2 circles of each size.


First development of applying circle attachments - I think the shapes on this design make the overall look very round and I want to create various shapes with no set placement until I feel it looks ok.


I absolutely love this, I love the big sculptural bends and the manipulation the the applied circles.


The issue with this look is once I had pinned the applied circle in place and sewn to the main dress the outcome would look very different or would hold the same way as it had when pinned.


Another development idea of circle placement - I really like the randomness of the circle placements which has created a different look every time 


I like the overall design where not being able to see the main body of the dress which creates a great illusion of the entire design.


 Back view of Look 1


Side View

Side view with zip fastening

Saturday 13 April 2013

Production of Look 1

Making Look 1 -

For this dress I designed the dress to be of a basic shape and have applied fabrics to create elements of 3 dimensional sculptures coming from the main dress to create an illusion.

For this dress I used a lingerie block which I adapted to my design by making the dress length shorter and cascading into a slight 'V' in the dress back, and having the zip fastening in the side seam and hidden with the applied attachments.

The main dress has been constructed using fuchsia duchess satin with a polyester lining, because the dress attachments will be quite heavy and the dress is very small with no sleeves or straps I needed the dress to be quite supported, and decided to include a hidden corset within the bodice.


Front and Back pieces of main dress


 Back of dress with sewn dart - pinned on stand


Pining of front and back dress pieces - Side view


Front of main dress with sewn darts


Making the lining using polyester...using the same blocks as I had used for the main dress.


Attaching the lining to the main dress


Attaching the boned corset to the dress


Front boned corset with interfacing to make stronger


Back boned corset


Dying my fabric for the applied circle attachments - Dying satin gazar with red acid dye


Died red satin gazar ready to cut out circle attachments from my own circle blocks.


 Cutting interfacing to iron onto circle attachments to make them firmer


Monday 8 April 2013

Finished and finalised prints for digital print

I have finally finished my prints for the digital print that will be featured on my gowns...it was a very long process however I think they look great...after photoshopping these paintings into my designs I decided to have one print per dress and it will look to complex and too much with too many different prints on one outfit.

So from these I picked 4 of my favourite prints and have sent them off to be digitally printed onto satin organza, which is sheer and I think it would look amazing to see the print layered on top so therefore you get kind flashes of print through the fabric.

Each print will be in a very large scale of being 2metres in length by 135cm the width of the fabric, this way the hand produced look will be evident.


 I chose this print


 I picked this print to be printed


 Also this print


I have not finished this print as I think it looks too different from the other paintings and may look odd.